Thursday, May 7, 2009

Basic equipment for hand-drawn animation

We'll go into more detail in other posts, but what are the basics you need to get started with traditional hand-drawn animation ?

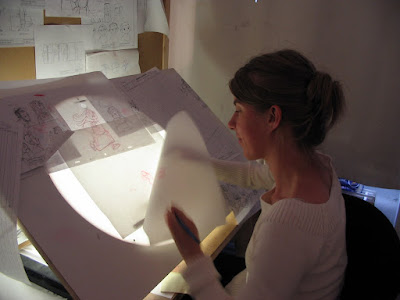
1.) Animation desk with animation disc , or a lightbox with pegbar. (get the disc if you can , it's better.)


2.) Extra ACME peg bar for scanning or video testing your drawings. Get a thin, metal tape-down peg bar if possible because those are the most versatile.  Lightfoot Animation  has them or you can get a less expensive one from Amazon.com at this link:

https://www.amazon.com/MyLifeUNIT-Stainless-Fixing-Animation-Positioning/dp/B01M5BCBNM/

3.) ACME punched animation paper. Lightfoot Animation or Cartoon Supplies have pre-punched animation paper (see links in sidebar) .   Ingram Bond animation paper from Lightfoot or Cartoon Supplies is recommended.   Ingram Bond paper is more expensive , but you'll notice the difference between this and the cheap photocopier-grade paper.   Ingram Bond  erases better, lasts longer, holds up to repeated flipping, the surface is better for drawing, it scans better.

4.) Pencils, various. Col-Erase red and blue.  Various brands of  Graphite pencils , HB, B, 2B .    Recommended graphite pencils include: Tombow Mono  and  Palomino Blackwing 602.

5.) Erasers:  Soft kneaded eraser (grey) , and "Magic Eraser" (white) .

6.) Exposure Sheets (free , printable X-sheet templates from AnimationMeat.com).  Pre-printed Exposure Sheets from Lightfoot Animation.

7.) Animation frame capture software. TVPaint Animation is recommended.  Or Digicel Flipbook or Toon Boom Harmony.  With TVPaint and Digicel Flipbook you can either scan your drawings or use an HD webcam for video capture of your drawings.  With Toon Boom Harmony you may only use a scanner .  Also look at a software like OpenToonz , which is free and can have scanned drawings loaded imported.

8.) a scanner for scanning your animation drawings into TVPaint , Digicel Flipbook,  Toon Boom Harmony, OpenToonz, etc.

The Epson Workforce Pro WF-7840 a good scanner that has both a Flatbed scanner and an Automatic Document Feeder for auto scaning up to 50 sheets at a time.


(NOTE: scanner models from Epson and other scanner manufacturers are constantly being updated , so the exact scanner model above may not be available, but look for a scanner that can handle paper size 11 x 17 , which will allow for scanning 12 Field animation paper or slightly cut-down 16 Field paper )

OR

8 a .) a digital video camera or HD webcam mounted on a down-shooter (tripod or ideally a copy stand) to capture your drawings via video feed into TVPaint or Digicel Flipbook, etc.


A couple of resource docs:

 Traditional Animation Materials List


Purchasing an Animation Desk or Lightbox


POST UPDATED 08/19/19 -


One of the basic items you need to animate is an animation desk or a lightbox.

There are many different configurations of desks , some of which I have shown in the web album Animation Desks gallery in the sidebar links. You can peruse that album for ideas on how you might set up your own workspace.

There is also a PDF booklet that I have prepared called "Animation Student's Guide to Animation Desks" which may be downloaded by clicking on the link.

While it is possible to purchase or build a large professional studio-style desk such as this example of a Disney Studio desk ---


most of use don't have the space or the funds to purchase such a large desk for our home studio. (these desks are wonderful, but take up a lot of space and are very heavy to move).

A good , portable animation desk is the one made by Colin Johnson of Vancouver, BC , available through his web site AnimationDesks.com

This desk is very good value for the money as he includes the white plexiglass animation disc , and a  backlight unit along with the desk itself. 

Animator Frans Vischer animating on one of the Colin Johnson desks. This photo is from Duncan Studios in Pasadena, CA where Frans was animating on the film Mary Poppins Returns (2019) 

There are similar portable table-top animation desks available from Lightfoot Animation , and ChromaColour U.K.


 https://www.chromacolour.co.uk/animationsupplies/lightboxes-disks/wooden-portable-lightbox-12ft-disc-pegbar.html

The ChromaColour portable animation desk is a little more lightweight and folds down flatter for storage,  if that matters to you .  Depending on where you live in the world the shipping from the U.K. may make this more expensive than the Colin Johnson Desk.

The Lightfoot portable lightboxes are much more expensive , but they do have a smaller "footprint" (only 24" x 24" compared to 36" x 24" on the Colin Johnson table and  30" x 24" for the ChromaColour table) , so if space is an issue you might want to consider one of the compact Lightfoot Easel Design Animation lightboxes :


 http://www.lightfootltd.com/content/new-led-easel-design-pro


---------
A more compact , less expensive option would be to use a simple lightbox with a fixed animation pegbar (no rotating disc).

Lightfoot Animation sells the Artograph LightTracer II 12 Field lightbox (12" x 18") with an Acme peg bar pre-installed for about $119.00


Some online art dealers such as Dick Blick Art have these Artograph LightTracer II lightboxes for less , so keep your eyes open . Dick Blick currently sells the 12" x 18" model for about $80.00 (compared to list price of $129.00) . Add a thin tape-down Acme peg bar from Amazon.com for $7.00  and you'll have a functional animation lightbox. 


Or you can use one of these thin LED Lightpads with a Stand -

https://www.amazon.com/dp/B013SHKTXO/ref=sspa_dk_detail_3?psc=1&pd_rd_i=B013SHKTXO   


A peg bar: https://www.amazon.com/MyLifeUNIT-Stainless-Fixing-Animation-Positioning/dp/B01M5BCBNM/


Get a stand for the lightpad to adjust it to a comfortable angle for drawing:
https://www.amazon.com/Ventilated-Adjustable-IMAGE-Multifunction-Prevented/dp/B07DJ6ZSGH/   


These sort of set ups with a simple lightbox or the lightpad on a stand will work, but the disadvantage is it doesn't fully rotate , so you can't turn your drawing to the most comfortable angle to draw from like you can with an animation disc.  The disc mounted in a portable lightbox or in a drafting table is better.


(Colin Johnson sells this white plexiglass disc with peg bar for $85.00 + $18.00 shipping.
Lightfoot Animation sells a similar disc for $129.00 + shipping. )


Traditional Drafting Table adapted to Animation Table:

A step-up from a portable table-top animation desk would be to have a hole cut into a standard wooden drafting table so you can mount an animation disc on it , with a backlight unit mounted underneath. What you would give up in terms of portability and compactness you would gain in flexibility and comfort. A drafting table can be adjusted in both height and the angle of the tabletop for the maximum in drawing comfort. You can adjust the table to whatever angle is best for you. If you have the space this is really the best option for a traditional animation set up.

The Alvin Pavilion wooden drafting table ,  offered in a range of sizes from 24x36 to 31x42  ,  is a good basic drawing table.  These tables are available from DraftingSteals.com or other art suppliers.


If you have the proper tools to make a precision cut 16 1/2" hole in the table top then you could cut the hole yourself , or hire a local woodworker who has the proper tools to make the cut for you .
You may have a friend or family member who has the proper tools to do this. Be very careful when cutting the hole.  The hole must be perfectly round with smooth sanded edges so the disc will turn smoothly.


Besides being able to fine-tune the height and angle of the drafting table it also gives you more space to pin up notes, model sheets, and X-sheets , especially if you use an extension panel as shown below. (the extension panel may also be used on the Colin Johnson desk to add space to clip on an X-sheet to the right or left side of the table.)

(click any image to view it larger)


(notice most of the artists have a corkboard on the
wall in front of their desks to pin up model sheets and
other notes)


If you have the extra space an over-size table top gives even more space to pin up your model sheets and other notes as shown below:


You will also find it useful to surround your drawing space with a folding table, shelves ("scene stackers") and/ or some sort of side-table unit to have a place to stack your drawings , blank paper, pencils, and other supplies, to keep them organized and close at hand.

Notice the tall scene-stacker to the right of this animator's work space. The drawings from various scenes can be kept organized in a shelving unit such as the one shown below:


This Winsor-Newton artist's tabouret shown below makes a good compact side-table unit for an animation desk. Paper can be stored in the lower shelves, while the interior drawers can be used to store pencils, erasers, peg hole reinforcements , and other supplies.


Here is another view of a typical animation scene stacker unit filled with animation drawings bound between chipboard panels and rubber-banded around the outside to protect the drawings and keep everything neatly organized. Below is a shorter scene stacker unit:


Anyone looking for ready-made Scene Stackers (for 12 field animation paper) take a look at these cube stackers available from various stores such as Target or Ikea -
There are other similar stacking shelf units available from different office supply and home decor stores.

The one linked to above is 15" x 15" , which is big enough for 12 field paper (12.5" x 10.5") , not quite big enough for 16 field paper (16.5" x 13.5" ) . Most people use 12 field paper so that's no big deal.  But if you wanted to use 16 field you'll need to find slightly wider shelves.

These type of shelf units (also from Target) are wider and you could add multiple shelves to it:


Scene stackers might not be the most glamorous item on your equipment list , but you'll be surprised how handy these shelves are for storing and keeping track of your animation drawings.

An inexpensive , functional scene stacker can be made from large size stacking file crates ("milk bottle crates") available from various office supply stores:


This economical file crate scene stacker could be further sub-divided into individual shelving compartments using sturdy cardboard or lightweight masonite panels held in place with wire or glued in place.

Do-It-Yourself- Animation Desk

As I mentioned in the previous post you may purchase a standard wooden drafting table and cut a 16 1/2" hole in it to fit a standard animation disc.

This is probably the easiest "do-it-yourself" animation desk if you have the right tools to make a precision circular cut like that. (it's trickier than it might seem at first, so "measure twice, cut once" and be careful.)


If you're skilled with woodworking you may also want to build your own portable animation table from these plans: 


Here is a link showing Sheridan College animation student Brock Gallagher making an animation desk very similar to the one shown in the plans above:

Building a Do-It-Yourself Animation Desk


Here is another do-it-yourself animation desk project with photos and detailed instructions:

How To Make An Animation Desk - Part 1 -4

The finished product from the project linked above:

(click on images to see them larger)


This photo from animator Dan Caylor shows the portable desk that he refurbished and added a new LED backlight unit mounted on a cross brace underneath:


--------
UPDATE: I'm happy to say I heard from animation student Marty Walker who built an Animation Desk using the Jim Macaulay plans I posted above. Check out the results :

http://chipsandsolstice.blogspot.com/2009/06/we-built-animation-desk.html


Marty was also good enough to list all the Materials and Tools needed for the project . See the link to his blog for the materials list.

By the way, for those of you who may not recognize the name of Jim Macaulay he was a great teacher of animation at Sheridan College in the 1970's , 80's, and into the 90's. Jim passed away at age 91 in 2015 .  He influenced many of us who attended Sheridan's Classical Animation Program during those years he was actively teaching (about 1975 - 1995) Here's a photo of Jim with a student :


(teacher Jim Macaulay with animation student 
Cathy Parkes at Sheridan College , about 1980.)

Jim also co-authored a book on storytelling in animation called "And Then What Happened?" with another Sheridan professor , Zack Schwartz.

Purchasing an Animation Disc

Post Updated 08/19/19 -

As I mentioned in my other post , a standard flat, rectangular or square lightbox with an Acme peg bar attached will do as the bare-minimum for animating, but it is best to have a lightbox or drawing table with a hole cut to mount a rotating animation disc. Believe me, it does make a difference. Rotating the disc gives you much more control over your drawings.


In years past when animators were expected to calculate their own camera/pan moves for their scenes , metal or wooden discs with sliding , ruled peg bars were the norm.

These peg bars were ruled in 20'ths of an inch to allow very close pan moves to be calculated by the animators and notated in the Camera column on the Exposure Sheet.


A precision, metal animation disc such as this deluxe model made by Mechanical Concepts is still a worthy tool, but not as necessary as in days past.


Nowadays when most camera moves are done within a digital ink and paint or compositing program (such as TVPaint, Toon Boom Harmony, Digicel Flipbook, After Effects, etc.) it is not as necessary to have the sliding peg bars on the disc to figure out the moves.

Many modern-day animators prefer to use a lightweight, relatively inexpensive white, translucent plexiglass disc. These type of discs originally became popular at the Richard Williams Animation Studio in the 70's and 80's and have since become widely used in the industry.

(Colin Johnson sells this white plexiglass disc with peg bar for $85.00 + $18.00 shipping.
Lightfoot Animation sells a similar disc for $129.00 + shipping. )


Here is Richard Williams animating on a plexi-disc at his studio in London:


Sylvain Chomet animating on his film "The Triplets of Belleville" :


The white plexiglass disc has the advantage of being much less expensive than the traditional metal disc with sliding peg bars , as well as being light-weight enough to carry around and use for animating in casual situations such as using ambient light to shine through the back as the animator rests the disc on his knees or on the edge of a chair or table. Richard Williams mentions in his book "The Animator's Survival Kit" , page 83, how he animated some of the first scenes in the film "Who Framed Roger Rabbit?" in a hotel room in Wales with a plexiglass animation disc propped up on his knees.
.

For those who want a disc with the ruled , sliding peg bars, Lightfoot has this black plexiglass disc with translucent white glass drawing area,  and sliding peg bars for $699.00 -
http://www.lightfootltd.com/content/10f-12f-16f-universal-pro-disc-wboth-round-acme-pegbars


ChromaColour U.K. has a similar disc for  £274.99 pounds which is about $335.00 U.S. dollars by the current exchange rate (08/19/19) . Check with Chromacolour for current price and shipping cost.
https://www.chromacolour.co.uk/animationsupplies/lightboxes-disks/disks/black-plexiglas-animation-disc-16f.html

Mechanical Concepts' 16F metal animation disc was about $650.00 when last made.
You may find one of these used on eBay , but I don't believe they are making them anymore.


Here is a typical animator's workspace with the popular black Chromacolour animation disc -


Typical animator's workspace with white plexiglass disc -


Either type of disc will work , but the less-expensive white plexiglass disc is sufficient for almost any type of traditional animation job.

More on Build-It-Yourself-Animation Desk

I saw a question posted on an animation forum about the type of hardware needed to make an adjustable light table, such as the one shown in the DIY Plans posted above.

The hardware is available from specialty hardware and woodworking stores . The name of this special type of hinge is a "lid stay" or "flap stay", or "lid support" .

See a variety of different kinds here:

Specialty Cabinet Supplies - Lid Stays
and here:

Rufkahr's Lid Supports

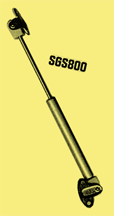
This kind available from Rufkahr's is called the X-70200/05Z Lift Up Ratchet Support.


Another kind of table support used is a Pneumatic Spring Stay :


In these photographs you can see how the Lift Up Ratchet Support is used to make a portable animation table , similar to this one : Portable Animation Table Plans,  but with the lift up supports.


In the following photograph of animator Børge Ring's animation table you can see the Pneumatic Spring Stay used to hold the table top at the proper angle: