Showing posts with label plans for animation desk. Show all posts

Thursday, May 7, 2009

Do-It-Yourself- Animation Desk

As I mentioned in the previous post you may purchase a standard wooden drafting table and cut a 16 1/2" hole in it to fit a standard animation disc.

This is probably the easiest "do-it-yourself" animation desk if you have the right tools to make a precision circular cut like that. (it's trickier than it might seem at first, so "measure twice, cut once" and be careful.)


If you're skilled with woodworking you may also want to build your own portable animation table from these plans: 


Here is a link showing Sheridan College animation student Brock Gallagher making an animation desk very similar to the one shown in the plans above:

Building a Do-It-Yourself Animation Desk


Here is another do-it-yourself animation desk project with photos and detailed instructions:

How To Make An Animation Desk - Part 1 -4

The finished product from the project linked above:

(click on images to see them larger)


This photo from animator Dan Caylor shows the portable desk that he refurbished and added a new LED backlight unit mounted on a cross brace underneath:


--------
UPDATE: I'm happy to say I heard from animation student Marty Walker who built an Animation Desk using the Jim Macaulay plans I posted above. Check out the results :

http://chipsandsolstice.blogspot.com/2009/06/we-built-animation-desk.html


Marty was also good enough to list all the Materials and Tools needed for the project . See the link to his blog for the materials list.

By the way, for those of you who may not recognize the name of Jim Macaulay he was a great teacher of animation at Sheridan College in the 1970's , 80's, and into the 90's. Jim passed away at age 91 in 2015 .  He influenced many of us who attended Sheridan's Classical Animation Program during those years he was actively teaching (about 1975 - 1995) Here's a photo of Jim with a student :


(teacher Jim Macaulay with animation student 
Cathy Parkes at Sheridan College , about 1980.)

Jim also co-authored a book on storytelling in animation called "And Then What Happened?" with another Sheridan professor , Zack Schwartz.

More on Build-It-Yourself-Animation Desk

I saw a question posted on an animation forum about the type of hardware needed to make an adjustable light table, such as the one shown in the DIY Plans posted above.

The hardware is available from specialty hardware and woodworking stores . The name of this special type of hinge is a "lid stay" or "flap stay", or "lid support" .

See a variety of different kinds here:

Specialty Cabinet Supplies - Lid Stays
and here:

Rufkahr's Lid Supports

This kind available from Rufkahr's is called the X-70200/05Z Lift Up Ratchet Support.


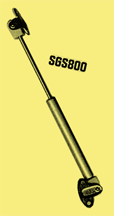
Another kind of table support used is a Pneumatic Spring Stay :


In these photographs you can see how the Lift Up Ratchet Support is used to make a portable animation table , similar to this one : Portable Animation Table Plans,  but with the lift up supports.


In the following photograph of animator Børge Ring's animation table you can see the Pneumatic Spring Stay used to hold the table top at the proper angle:

Another Do-It-Yourself Animation Desk project

For those of you with the right tools and the do-it-yourself motivation here is another project to inspire you to build your own animation desk . Click on this link to see details: 

How We Built My Animation Desk


This one starts with a base adapted from an old computer desk :


The rest of the desk is built on top of the computer desk with the typical wood railing system which raises and lowers the angle of the desk top as desired. (or you could also use the ratcheted lid stay hardware shown in one of the posts above in place of the wood railing to raise and lower the table top.)


And here are a couple of photos of the finished product . 
Pretty nice ! 


This desk has a useful feature that many desks lack: the hole for the disc is off-set so there is plenty of space to one side to place the X-sheet, models sheets, or any of the other dozens of little Post-It Notes and other scraps of papers that animators accumulate while animating.  (also the optional pencil holder , available from Lightfoot Animation .) 

More details and photos of building this desk at the original link:

http://cartoonmeltingpot.wordpress.com/2009/01/25/how-we-built-my-animation-desk/


-------